Video Transcript:
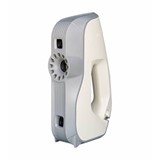
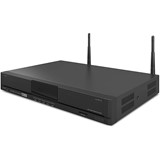
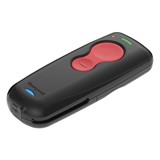
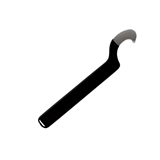
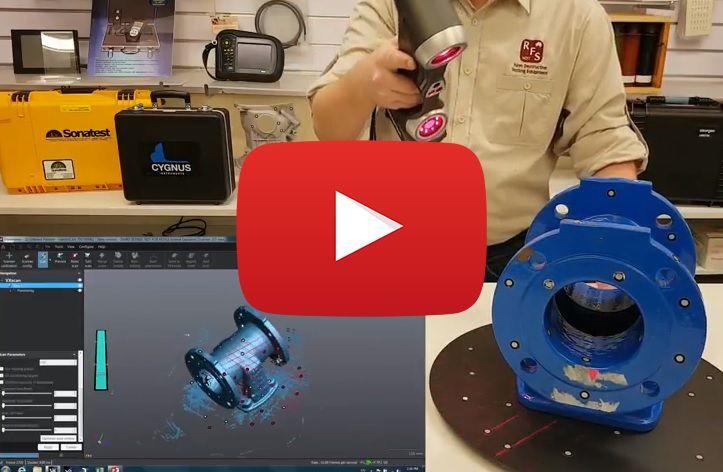
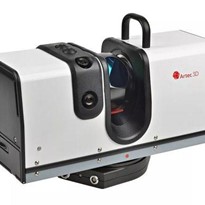
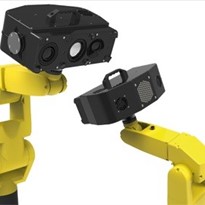
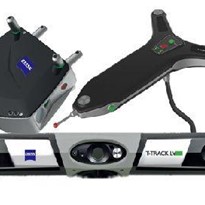
Hi guys, I'm Paul from Russell Fraser Sales and today we're going to be looking at the new 3d scanner from Creaform, the Handyscan 700. Before we start I should mention that even though Creafom have a number of software options for non-destructive testing, that's PipeCheck and SmartDent, both of them still use this scanner so we're going to look at the software in another video. For this video, we're going to focus on the hardware itself so here we have the case for the Handyscan 700 so there's two models that are used with the non-destructive testing software, this one the Handy scanner 700 and the Handyscan 300. Let's have a look what you get inside, so we open it up, they all come with this nice fitted case. Here we have the scanner itself so this is the 700 you've got your two cameras, your laser emitters on the back, you've got a couple of control buttons and the USB and power connections. You've got the power adapter as well as a few other connections for other countries, USB flash drive. These are your positioning targets you get four packs 500 targets in a pack, these are self-adhesive targets, you've got a lens cleaning cloth and your USB 3 cable. You've also got a scraper for getting the targets off when you're done. Underneath this we've got all your calibration material so we've got our calibration certificates and documents related to the lasers and how to connect it all up, and here we have your calibration plate. So this is unique to the scanner it's very important we keep this safe. This is how you calibrate the scanner on-site which I'll show you in a second. So when you buy a system you'll get a laptop with it. The new laptops are the HP's Zbook G3 it's a 64 gigabyte RAM i7 processor laptop - it's very high spec. Creaform have tried a few different laptops and this is the one they recommend for use with this system; we strongly suggest you get one of those.
It's very simple setup so here we've got a USB cable USB 3 so these scanners take 480 thousand measurements a second that's why we you need USB 3 it's also going to need such a powerful laptop. USB there, this is your power adapter that we showed you before that goes into their USB connection and power. That's up, that's all there is to connect it. Now we just start off the software and we're ready to start scanning.
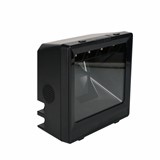
So once you've got it all setup the first thing you want to do is a calibration so we've got our calibration plate out of the box here open it up going in to start a scanner calibration in the software you can see the the what's on the screen matches the plate here sorry we have to take the scanner and begin scanning. Might not show up on the video but the seven laser crosshairs being projected onto the screen here so you can see the blue dot represents the scanner, changes size depending on how close I get and where I move it so what we want to do is get everything in the green. I start by stoking down and then I go up now I tilt it side to side. Takes a little bit of practice sometimes. That's the calibration done next thing we're going to do is a configuration. I'll just get a different sample for that.
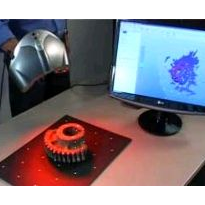
So here we have a sample we're going to scan this is just a conveniently sized sample for the demonstration but you can scan quite large objects you're only limited by the amount of RAM in the laptop in terms of size so when you're doing something like an oil pipeline you can quite easily scan a large section of it if necessary you can take a couple scans and merge them together later on. The first thing I'm going to do is configure this for the sample so depending on your lighting conditions and color of the sample you may need to adjust the shutter speed and laser intensity things like that so we're going to set this to an automatic adjust. I'm going to start scanning the blue part of this so this is what we want to scan so you'll see the shutter speed is changing it's becoming a bit more saturated we want yellow while the yellow is good eventually this will figure out what wants to be there we go so now that we've done our calibration we're ready to start scanning. So I've already put all the dots on here, these are just the self-adhesive targets just stick on you need enough on here that the scanner can see four in any given time if you can't see four it can't figure out where it is in relation to the part and will temporarily stop the scan - you'll see what I mean in a second.
So we've done the configuration the first thing I'm going to do is scan the positioning targets so I've got a small sample here for the sake of the demo but you can have quite a large sample whether it be an oil pipeline or an aircraft wing I'm just going to begin the scan for now for the positioning targets so I hold the button for two seconds put it in scan mode one more tap against the scan you can see the lights being emitted and it's beginning to collect all the data of the positioning targets. You can see I can move just wave the scanner around almost like spray painting so the red targets are the ones it's actively using for its calculations. It doesn't matter if the part moves as you can see. Okay so we've got all those now, we're gonna scan the surface so once again hold for two seconds and press the bottom to begin the scan. Now it's going to start collecting data. So the bar on the Left has to do with my distance so ideally you want to be about thirty centimeters away from the sample. The bar on the left tells you whether you're too close or too far away that's purely to do with the focal distance of the two cameras. Might not show up very well in the screen but there's the seven laser crosshairs being projected onto the surface and then the camera's then using a little bit of trigonometry and things like that to figure out the shape of the surface. It can scan it pretty quickly going over it to get the bits I missed and see it's also picking up some of the table things but I can easily delete them from the scan when I'm done. When I'm in areas that may be a little bit trickier I can also put it into single line mode makes it a bit easier to focus on some trouble areas but also reduces the collection rate of the data a little. Bit close, okay get into a few nooks and crannies. Now if you we're going for a sample that had lots of light patches and dark patches you can change this shutter speed and things on the fly. You can use the buttons on the back here these buttons to adjust the zoom you can also change the shutter speed so I'm manually adjusting the shutter speed for different lighting conditions.
There we go I think I've got a pretty good collection over there now. I'll turn the scanner off so there we go quickly deleted the table and things that we collected and then scan and here you can see it's very, very accurate so the moment I have this set at a resolution of one mil the scanner has an accuracy of thirty microns and a maximum resolution of 50 microns so there's a very precision piece of instrument but we find for most NDT applications one millimeter is about ideal for what you want so as I mentioned this is the handyscan 700 we're going to do some other videos when we look at more detail in the NDT specific software that's PipeCheck for pipeline analysis and SmartDent for aircraft dent analysis but in the meantime if you have any questions please feel free to contact us at Russell Fraser sales.

(1)-205x205.jpg)