

Step 1: Create a Validation Plan
The validation plan is the master reference document specifying the action that the company will take to qualify all aspects of the facility, equipment and staff to ensure compliance standards are upheld. Keep in mind this plan will be the first thing regulators will see to evaluate the company’s methods, so rationale on methods should be thoroughly explored.
Be sure that your validation plan clearly covers the topics as follows:
- State the validation objectives and identify staff roles, responsibilities and who will have authority
- A detailed list of validation activities, processes and the equipment that will be used
- What the company’s response will be if temperature, humidity, pressure or CO2 levels breach tolerance
- The validation schedule
- Reassessment protocol when conditions or events such as maintenance, construction or reorganizing result in the need for revalidation, or if the study results indicate the need for adjustment
Step 2: Determine What Areas Will be Monitored and Identify Areas of Risk
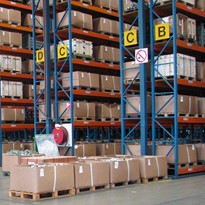
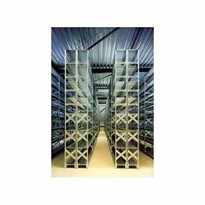
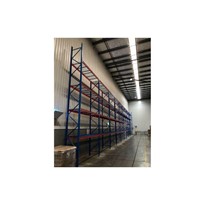
If a warehouse is large, there is a greater risk of temperature fluctuation throughout the space. Smaller warehouses tend to heat up more quickly, which poses just as much risk to the product inside. Every warehouse is different, so it is necessary to have a basic understanding of the particular environment prior to beginning the mapping process and identify areas that are at risk of unacceptable variations.
Consider the impact of the following:
- Volume of space and HVAC demands
- Temperature gradients from cooler air near the floor and warmer air near the warehouse ceiling
- Fans, air conditioners or space heaters that may create pockets of warm or cold air
- Layout of shelving and racks to identify any airflow obstruction
- High traffic areas, windows, doors or loading docks
- Seasonal temperature changes or extreme weather events
Step 3: Create the Detailed Protocol
Using the information collected during the risk assessment, be sure that the protocol includes all the necessary details pertaining to the mapping study and an explanation of how those decisions were made.
Include the following:
- What parameters will be monitored and at what reading intervals (example relative humidity at 5 minute intervals)
- How many data loggers will be used of each type and the distance between where they will be placed
- A diagram of the facility showing where all the data loggers will be located
- The duration of the mapping study (be sure that the duration spans any variety of activities that may impact fluctuations such as weekends versus
- weekdays or delivery days for example)
- Calibration needs, battery life or maintenance requirements of all data loggers and related equipment
- Acceptable range of variation over time for each measured parameter to ensure the preservation of products stored
The distribution and placement of the data loggers should be well thought out and follow a uniform pattern. Top to bottom, left to right, front to back, for all racks and shelves within the warehouse. The distance between data loggers will vary with each facility, based on the size of the rooms and risk factors. These factors must be consider when creating the protocol (see diagram in Step 2).
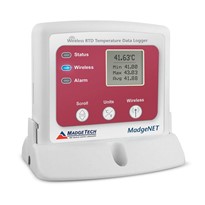
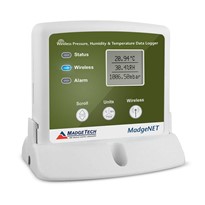
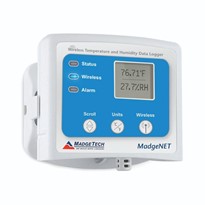
MadgeTech data logging systems support GMP compliance needs by allowing the user to select the desired time interval for readings and identifying each data logger uniquely within the software interface as well as in reports and on the physical device. This enables users to easily pinpoint and correct for any variance with accuracy. MadgeTech recommends setting the device readings for at least one reading every 15 minutes in order to collect enough data points to provide a comprehensive overview of the warehouse.
Step 4: Select the Appropriate Equipment
MadgeTech’s highly knowledgeable staff are available to answer questions and guide customers through the process of choosing the right tools for the job. Our technical sales and support team are experienced with the variables of mapping studies and are even available for on-site assessments or implementation if needed.
Some things to consider when selecting equipment:
- Minimal potential for data loss or error
- High accuracy for each parameter
- Configurable reading rate
- Speed of response time and sensitivity of the device (a faster response will provide more specific results to help identify problems)
- Maintenance and calibration frequency required
- Configurable alarm notification options to quickly inform users of any deviations, such as audible, text and email alerts (this can be
critical in heading off a problem prior to losing or damaging any stored goods) - Comprehensive reporting tools and data viewing options (Graphs,
tabular or real time data)
Step 5: Set Up the Data Loggers Throughout the Warehouse
The data loggers should be set up according to what is established in the protocol. As a basis, the warehouse can be divided into several sections and layers, with loggers placed in each one. It is important to consider the product itself. If the product is being stored on shelves or racks, the data loggers should be placed in the middle of the racks throughout each layer to provide a representation of what the product is experiencing.
Step 6: Conduct a Test and Review the Results
Once the data for the study has been recorded, it can then be downloaded onto a PC for analysis and review. MadgeTech wireless data loggers can also transmit data in real time, providing the user with an instantaneous view of the environment as it is happening. This is especially beneficial if the mapping study is time-sensitive.
Once data has been downloaded, the MadgeTech Software provides built in report options that can present the findings in a graph, tabular
or summary format, or easily export the data to Excel® for more custom presentation if needed. The Mean Kinetic Temperature is automatically calculated in the MadgeTech software (MKT is required for GMP compliance). All downloaded data is automatically saved to the internal database file of the MadgeTech Software. This is an important feature that ensures that records are saved and available if needed in the future.
The mapping test findings should include the following information:
- Date and time of the test study
- Data for each data logger and parameter with time and date stamps for each reading
- Calculated values for the average, minimum and maximum for each parameter channel
- A graph display of all data logger parameters over the duration of the test
- Calibration information of the equipment used
- Reading rate and other device settings used
- Provide a document with space for notes and approval signatures
Step 7: Make Modifications as Necessary
After the data has been sufficiently analyzed and documented, it may become clear that certain aspects of the warehouse need to be changed.
Some common adjustments are:
- Moving rack locations that are too close to risk factors
- Adjusting HVAC settings or location of vents (an HVAC expert may be needed to evaluate the system)
- Rearrange shelves or racks to eliminate obstruction of airflow
- Add fans or increase ventilation in certain areas
- Address traffic to reduce opening and closing of doors
- Block sunlight that may be causing a hot zone
- Each modification made in the system should subsequently be documented in the protocol and approved
Step 8: Initiate the Mapping Study Schedule
After the initial test study is complete and any necessary adjustments have been made, start the implementation of the mapping study
schedule that has been outlined in the protocol document. The first instance of the study from this point should meet all requirements or be
assessed for further modification.
FAQ
How often should you map your space?
Some protocols call for mapping every three months while others can suffice with yearly. The validation plan should take into consideration any seasonal impacts such as weather changes or product volume trends. Any major event in the facility such as construction or HVAC changes could justify an unscheduled validation run. Consider these variables when making your frequency decisions.
How long should the mapping study last?
Be sure to plan the duration of your study for a realistic period of time that represents an adequate sampling of what the environment is exposed to. For instance, make sure the testing period covers weekends, when there may be little or no activity and also during a busy time when doors are constantly being opened and closed. Depending on the workflow of the facility, this may be more efficient to do in several small studies versus one long one.
Where can I find more regulation and guideline information?
Warehouse mapping regulations such as CFR Title 21 require documented evidence that the storage environment is tightly controlled in a way that preserves the products and goods stored there. Performing the mapping studies as outlined in this document will provide that. These standards are continually affected by technological advances and it is imperative to keep abreast of the changing standards, please see the reference section for some suggested resources.