Video Transcript:
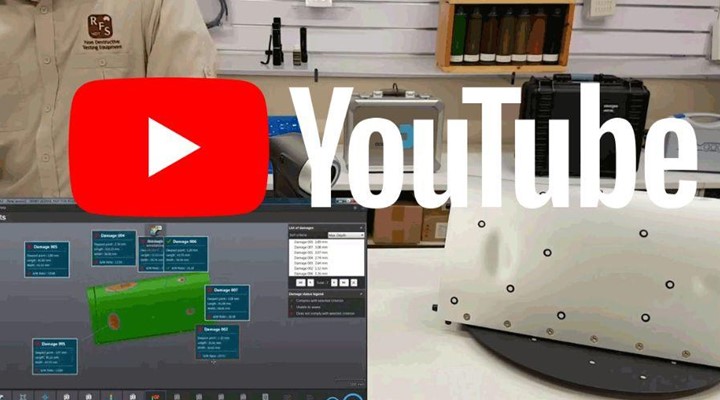
Hi guys I'm Paul from Russell Fraser Sales, today we're going to be looking at what's in the box with the newest NDT software from Creaform - SmartDent 3D.
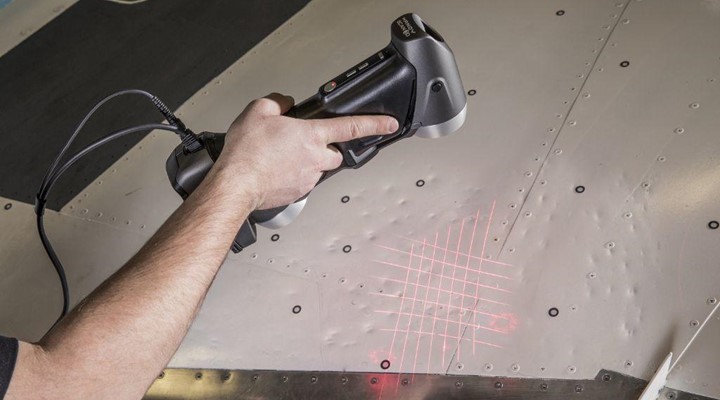
So SmartDent works with the Creaform Handyscan 700 we looked at this in more detail in another video. Here we have our sample part for the day this is made by Creaform based on feedback from a number of aircraft manufacturers. We've got some flat bottom holes on the back here, a number of simulated dents including ones on the leading edge here and a few more on the front as well including a really small one here I've also got some rivets and things on them on there and these are our tracking targets for the camera.
So we're going to take you through a guided analysis in the software this is very similar with the guided analysis in PipeCheck. It's going to take you through your step by step almost like a setup. So the first thing it's going to ask for is what kind of units you want, metric or imperial, we're going to leave it on millimeters. Scanner calibration I've already done that, lets skip that step. Configuration that just configures the scanner, the cameras and the laser intensity for the surface we're going to be scanning I'll skip that step as well. Scan resolution I'm just gonna go ahead and leave that at one millimeter.
Okay now we're ready, the first thing we're going to scan is the positioning targets so I'm just gonna tap the scanner here to begin and there we go so it's just a matter of waving the camera around to make sure you get all the targets. Okay got that and now we begin the actual scan. So as you can see this might not show up on the camera but there's a number of laser crosshairs being projected on this surface. This is very much like spray painting it's just a matter of shining the lasers across the surface letting the cameras pick up the detail of surface clip part. As you can see it has no issues with the shiny surface should get everything - that looks good. As you can see I've got a little bit the table in that do that my hands went up under the things that I can easily delete those later on.
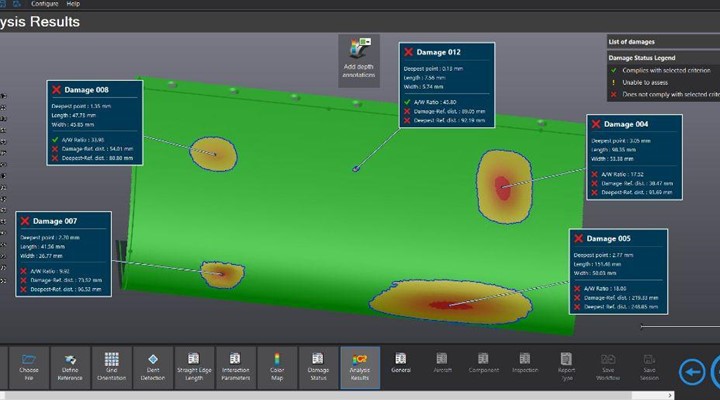
Okay so here we are I completed scan now put that setting to one middle resolution we can increase the resolution if we want but for the sake of this demonstration I think one millimeter is enough. This is where it asks you to save your data so you can always come back to it at a later date if you need to. I've got a little bit the table included in there so I'm just going to delete the isolated patches. Now I'm going to add the references. So on the front here I'm going to create one called rib one, rib one and up here I'm going to add another one called string of one - you can add any names you want to it to this point and as many as you want any as many references as you want really. So what the software is doing is taking a virtual pit gauge and going along the surface the same as PipeCheck does so at the moment it's asking for parameters about how you want to set up a pit gauge so let me leave that at zero degrees as it's all green and looks like it's got a very good analysis the only blue we're seeing there is inside the dent I'm not worried about that and this is automatic damage detection so there's a lot of things in there we're not interested in. I'm going to turn this down to zero as you can see that drop-off turn it down to zero and just put them in manually, there's a little dip there you might be able to see it on the camera this is a very small dent just here I'm interested in. I've got a couple on the leading edge here as well and some on the back. Straight edge lengths want this to be longer than the longest dent you've got so the longest one is this dent on the leading edge here I'm going to set it about 150 mm I think. Okay our parameters just to decide what is a dent and what isn't and leave them at default and leave the color scheme on default. Here we can add our criteria so I'm just gonna use the AW ratio there are a number of options you can use here but I'm just gonna leave it at AW as it seems to be the most popular for Aerospace and there we have our analysis - very quick when you think about how long that would have taken with a conventional pit gauge you can see a big benefit in this software!
So only one of the features has passed based on the criteria we gave it that's why on the front here, everything else has failed the little one on the front based on the criteria we gave it isn't qualifying as a dent so that's fine everything else has failed. On the side here we can look at them all individually so they're sorted by a maximum depth at the moment then for each one do you get a full breakdown so the AW ratio for this is ten point six eight deepest point on the side here we see all the details about it we also get distances to all the reference points basically everything you would want to know when I go back and look at all of them.
I'm going to move on to the report, so at this point it's going to ask for information like the inspectors name, part numbers things like that all information that would normally go into a report. I'm just going to skip through these for the sake of the demonstration. Now we have a few export types here - I'm going to use a general Excel report I'm going to select all the features and I'm going to export it just gonna put this on the desktop under the name of test give that a few seconds. The important thing to note about this software is that it's a tool not a new method; it still uses the pit gage method so it's not trying to reinvent the wheel as such. So now that the report is done we have an overview on the first page followed by a detailed breakdown of each one of the features. It is a very powerful tool when you think about how accurate it is and how fast it is you can definitely see the benefits over an old conventional manual pit gage. So this is SmartDent from Creaform. It is available through Russel Fraser Sales if you have any questions please feel free to contact us.