For example, the multiplier and offset of the temperature measurement of the HMP50 is 0.1 and -40 respectively. So the sensor output starts at -40°C (0V) and will output an extra 1mV for each 0.1°C above -40°C. This is what the manual tells us, however this may be an old sensor which is suspected of falling out of calibration, or this may be a sensor we don’t have a manual for and would like to determine the multiplier and offset.
To determine the multiplier and offset we need another method of measuring the temperature (or any other parameter) to obtain a set of known temperatures. For each of these known temperatures we measure what our sensor is outputting and we can then use some maths to come up with a multiplier and offset. The FieldCal Instruction is used to calculate the multiplier and offset for us.
Usage
BeginProg
Scan (1,Sec,1,0)
VoltSe (Temperature,1,mV5000,1,1,0,250,MultV,OffsetV)
FieldCal (2,Temperature,1,MultV,OffsetV,Mode,KnownValue,1,3)
NextScan
EndProg
Above is a simple program which uses FieldCal(), the instruction is executed with every scan, but depending on the value of the Mode parameter, the FieldCal() will perform a different function with every scan. Two public variables named Mode and KnownValue have been declared for the program above, these can be edited in the numeric screen so the user can change their values at run time.
To start the calibration the user first takes a measurement of the temperature (or whatever parameter they are measuring) using another reference device, this is entered into KnownValue using the numeric screen.
Manual Calibration
The user then enters the number 1 into Mode. On the next scan the FieldCal() instruction will measure the sensor, then compare it’s output to the KnownValue the user entered. This is enough to calculate just an offset for the sensor, but another point is required to calculate the multiplier.
The program will change the Mode variable to 3 once the first point has been stored, the user then warms the probe (or tries to change the parameter they are measuring) and enters the new value from the reference sensor into KnownValue.
The user then changes Mode to 4 and on the next scan the FieldCal() instruction will calculate the multiplier and offset and enter them into MultV and OffsetV respectively. These can then be used as the Multiplier and Offset for the measurement instruction as in the VoltSe instruction above.
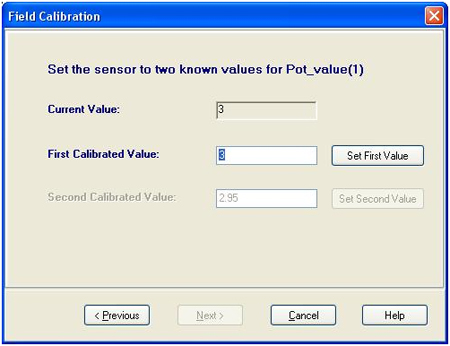
Wizard Calibration
The process above can also be completed using the Calibration Wizard in the connect screen, it can be found under Tools | Calibration Wizard.
The wizard will guide a user through the calibration process with explanations of each step, but behind the scenes it is performing the same steps as the manual calibration method.
Other Options
This calibration can be done with any number sensors using the Reps parameter and arrays for Temperature, MultV, OffsetV and KnownValue.
In addition to calculating the multiplier and offset, the FieldCal instruction will save a .CAL file to the CPU drive of the logger which contains all the multipliers and offsets calculated in the last calibration. This .CAL file can be loaded into another program (or the same program after a logger power failure) using the LoadFieldCal() instruction.
Once a calibration has taken place, the NewFieldCal boolean and SampleFieldCal instruction can be used to store the calibration in a datatable as below:
DataTable (CalTable,NewFieldCal,50)
SampleFieldCal
EndTable
The table above will store directly after a calibration has been performed (setting NewFieldCal to TRUE), then SampleFieldCal will retrieve the multipliers and offsets from the calibration and store them in the datatable.